Tuning Dellorto DHLA carburettors
Carburettor balance affects most aspects of your engines performance; throttle response, smoothness, fuel economy and running temperature. If you're running this type of setup (either Dellorto or Weber) then it is strongly recommended that you accurately balance the carbs, both barrel to barrel and carb to carb, before trying to optimise the jetting. You may find that a lot of "problems" just go away when the carbs are properly balanced.
Synchronising the carburettors consists of adjusting the flow of fuel-air mixture through each barrel so that it is exactly the same as each each of the others. The following balancing procedure assumes the carbs are in generally good condition, the floats are set to the correct levels (high and low limits) and the ignition is in good condition and properly timed.
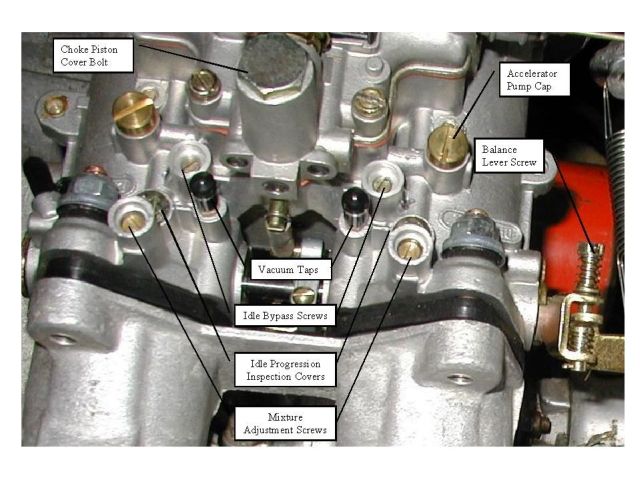
Refer to the drawing, below during the tuning procedure. Click the drawing for a photograph showing the adjustment points:
- Throttle Lever - Connected to accelerator pedal, changes engine speed
- Idle Speed Screw - Sets the carburettor(s) idle speed
- Throttle Lever Exension - Part of the throttle lever the idle speed screw hits
- Throttle Balance Lever Screw - Used to synchronize the carburettors
- Throttle Balance Lever - Spring loaded lever that connects the carb
- Idle Mixture Screw - Adjusts the amount of idle fuel-air mixture to the carbs
- Idle Air Bypass Screw - Used to balance air flow through carb barrels
- Vacuum Tap Blanking Plug - Used as connection points for a manometer
Step by Step Procedure
- Remove any anti-tamper seals from the idle mixture screw (6) housing (boss). You might also need to replace the idle mixture screws to ones that are easier to adjust if the stock screws are "tamper proof" (ie, have no conventional screwdriver slot, and are recessed in a boss). Replacements are available (from the usual suppliers) that stick up out of the boss and have a slot for a straight screwdriver blade.
- Check that the idle air bypass screws (7), to which anti-tamper paint may have been applied, are completely closed.
- Dellorto DHLA's have built-in ports for connecting a manometer. The ports are located right next to the idle mixture screws and may have vacuum tap blanking plugs (8) fitted. The blanking plugs must be replaced with vacuum taps / spigots before the manometer tubing can be installed; one tube per carb barrel. Some Dellortos come equipped with brass spigots already in place. During normal operation these are capped to prevent air intake - simply remove the caps for this procedure.
- Connect a four-column manometer to the carburetor vacuum taps, making sure you know which column goes with which carburetor barrel.
- Connect a reliable tachometer.
- Start the engine and leave it running to attain normal operating temperature.
- Set the idle to about 950-1000 rpm by adjusting the idle speed screw (2).
- Turn the four Idle air bypass screws (7) in so they are fully closed. Just seat them, don't use any pressure on them.
- Adjust all four idle mixture screws (6) to give the strongest vacuum (tallest manometer column reading) for each barrel. Turn clockwise to lean the mixture, and anti-clockwise to richen the mixture.
- Re-set the idle speed to 950-1000 rpm using the idle speed screw (2) if the idle speed changes much when the idle mixture screws (6) are adjusted.
- Adjust the carburetor throttle balance lever screw (4) to match the weakest barrel on the front carb to the weakest barrel on the rear carb.
- Open the idle air bypass screw (7) on the strongest barrel of each carb and weaken it's vacuum until it matches the weaker barrel on that same carb. Match one barrel on a carb to the other barrel on the same carb. Don't match between carbs with this adjustment. When you are done, there should be only one balance screw open on each carb.
- Re-set the idle speed to 950-1000 rpm using the idle speed screw (2).
- All adjustments should be made to match the flows to within 3mm of mercury.
- After making the adjustments, your starting point may have been thrown out of whack. Go back and repeat the procedure from the start. Re-set the idle speed, adjust the idle mixture screws for strongest vacuum, balance the weakest barrels on the front and rear carbs, balance the strong barrel to the weak barrel on each carb. If nothing changes, you are done. If you need to make any significant changes during the second trial, you may want to repeat the procedure yet again until it stabilises.
- Remove the manometer (and any adapters) and replace the vacuum tap screws/plugs/blanks.
First start after rebuild
If you are starting the car for the first time since the carbs were re-built, the idle may not be anywhere close to right and you may need to complete a preliminary setup as shown below before you attempt to balance the carbs.
- Disconnect the throttle cable or make sure it is not pressing the throttle open or closed.
- Unscrew the idle speed screw (2) out of contact with the throttle lever extension (3)
- Unscrew the balance lever screw (4) of the balance lever (5) until the throttles of both front and rear carburetors are fully closed. Check that they are with light upward pressure on throttle lever (1). While maintaining pressure on lever (1), tighten the balance lever screw (4) until it contacts the tongue of the throttle balance lever (5), thus fully closing the throttles of both front and rear carburetors.
- Tighten the idle speed screw (2) one more turn after it first contacts the extension (3) of throttle lever (1).
- Remove any anti-tamper seals from the idle mixture screw housing (6) and unscrew each screw 2.5 - 3 turns from the fully-closed position.
- When you start the car, you can always keep the revs up with your foot if you have to. Once the engine is running and settled down, you can adjust the idle speed.